All about GIT And GITHUB Use case daily basis

In the world of software development, version control is a fundamental and indispensable tool. It allows teams to collaborate efficiently, track changes, and manage codebases effectively. Git, combined with platforms like GitHub, has revolutionized the way developers work together. This beginner's guide will introduce you to Git and GitHub, along with practical examples to get you started.
Understanding Version Control
Imagine you're working on a software project with a team of developers. Everyone is making changes to the codebase, adding new features, fixing bugs, and making improvements. Without version control, this process can quickly become chaotic. Version control systems (VCS) like Git help you manage these changes by:
Keeping track of who made each change.
Allowing multiple developers to work on the same project simultaneously.
Rolling back to previous versions if something goes wrong.
Creating branches for new features or bug fixes.
Git: The Heart of Version Control
Git is a distributed version control system developed by Linus Torvalds, the creator of Linux. It's lightweight, fast, and incredibly powerful. Here's how Git works:
Snapshots, Not Changes: Git doesn't track changes but takes snapshots of the project at each commit. This makes it efficient and lightning-fast.
Distributed: Every developer has a local copy of the entire project history, making it easy to work offline and collaborate.
Branching and Merging: Git's branching model allows developers to work on separate features or fixes independently and merge them seamlessly.
Getting Started with Git
Installation
To begin using Git, you'll need to install it on your computer. Download the installer for your operating system from Git's official website and follow the installation instructions.
Basic Commands
Initialize a Git Repository:
To start tracking changes in a directory, run:
git initconfigure and view Git settings
git configis a Git command used to configure and view Git settings at various levels, including system-wide, user-specific, and repository-specific settings. It allows you to set your name and email, customize Git's behavior, and manage various configuration options. Here's how you can usegit config:Set Your Name and Email:
Configure your name:
git config --global user.name "Your Name"Configure your email:
git config --global user.email "your.email@example.com"The
--globalflag sets these values globally for your user, so they are used in all Git repositories on your system. If you want to configure these values on a per-repository basis, omit the--globalflag.You can view Git configuration settings using
git config --listwithout any additional arguments:git config --listThis will display a list of all the configured settings that u have set.
To Set the default text editor (e.g., Vim or VS Code):
git config --global core.editor "vim"Change the default branch name from "master" to "main":
git config --global init.defaultBranch "main"Configure Git to use a specific merge strategy (e.g., "ours" or "recursive"):
git config --global merge.defaultToUpstream "ours"To remove a specific configuration, you can use the
--unsetoption:git config --global --unset user.nameThis will remove the global user name configuration.
Remember to replace
--globalwith--systemor use it within a specific repository context to configure settings at different levels (system-wide, user-specific, or repository-specific). Proper configuration is essential for smooth Git usage and collaboration.
Clone a Repository:
To create a copy of a remote repository on your local machine, use:
git clone <repository_url>
Add Changes:
To stage changes for commit, use:
  git add <file_or_directory>
  for present directory files :- git add .
  To unstage a file :-git rm --cached filename
  To unstage all files in satging area:- git reset
Commit Changes:
To save staged changes to the repository with a commit message, run:
  git commit -m "Your commit message"
  git commit -am "Your commit message"
Check Status:
To see the current status of your repository, use:
git status
View Commit History:
The git log command is used to view the commit history in a Git repository. It displays a list of commits, including information about each commit, such as the author, date, and commit message. You can customize the output using various options. Here are some commonly used git log commands with examples:
  git log
  git log -n 5
  git log --name-only
  git log --oneline
  git log --graph --decorate
  git log --since="7 days ago"
  git log main
git log -n 5 :- shows last five commits
git log --name-only :- This will display a list of commits, along with the names of the files that were modified in each commit.
git log --oneline :- This will display a list of commits with each commit represented as a single line only commit id and commit message is displayed.
**git log --graph --decorate :-**This command displays a graphical representation of your commit history along with branch and tag labels is beneficial when you want to get a visual representation of your Git repository's history, especially when you have multiple branches and tags.
It aids in understanding how branches diverge and merge over time.
git log --grep="keyword" :- To search for commits with a specific keyword in their commit messages.
git log --since="7 days ago":- To view commits made in the last 7 days:
git log main :- To see commits for a specific branch (e.g., "main"):
Create a Branch:
In Git, branches are a fundamental concept that allows you to work on different lines of development simultaneously. They enable you to create isolated environments for new features, bug fixes, or experiments without affecting the main codebase until you're ready to merge your changes. Here, I'll explain Git branches and how to work with them.
To create a new branch, use:
git branch <branch_name>
Switch Branches:
To switch to an existing branch, use:
git checkout <branch_name>Creating and Switching to a New Branch in One Step:You can create and switch to a new branch in one step using the
-boption with thecheckoutcommand:git checkout -b <branch_name>To check all branches present, use:
  git branch
  git branch -a (shows all branch remote and local)
Merge Branches:
The
git mergecommand in Git is used to combine the changes from one branch into another branch. Merging is a fundamental operation in Git, allowing you to incorporate changes from feature branches or bug fix branches into your main development branch. Here's how to usegit merge:Merging a Branch into the Current Branch:
Switch to the Branch You Want to Merge Into: Before you can merge changes, you should be on the branch where you want to incorporate the changes. For example, if you want to merge a feature branch into the main branch, switch to the main branch first:
git checkout mainRun the Merge Command: After switching to the target branch, you can use the
git mergecommand to merge changes from another branch. For example, to merge a feature branch named "feature/new-feature" into the main branch:git merge feature/new-featureThis command takes the changes from "feature/new-feature" and applies them to the current branch (main).
Merge Conflicts:
Sometimes, when you attempt to merge branches, Git may encounter conflicts if changes in the branches overlap or conflict with each other. When conflicts occur, Git cannot automatically determine which changes to keep, so it asks you to resolve the conflicts manually.
When you encounter a merge conflict, Git will mark the conflicting areas in your files. You need to open the conflicted file, resolve the conflicts by choosing which changes to keep, and then commit the resolved file. After resolving all conflicts, you can continue the merge process by running git add .and git commit


Merging with a Fast-Forward:
In some cases, merging doesn't create a new merge commit; instead, Git Merging with a "fast forward" means that when you merge one branch into another, Git doesn't create a new merge commit. Instead, it directly moves the branch pointer of the target branch to the tip of the source branch. This happens when there is a clear, linear path from the current branch to the branch being merged, and there have been no additional commits on the current branch since the source branch was created.
Merging with a fast-forward can be demonstrated with a simple example. In this example, we'll create a new Git repository and perform a fast-forward merge to see how it works.
Let's assume you have an empty Git repository, and you want to create a new branch, make some commits on that branch, and then merge it into the main branch using a fast-forward merge.
Step 1: Create the Git Repository
First, initialize a new Git repository and create an initial commit in it:
        # Initialize a new Git repository
        git init

        # Create a new file and add some content
        echo "This is the main branch" > README.md

        # Add the file to the staging area
        git add README.md

        # Commit the initial changes
        git commit -m "Initial commit on main branch"
Step 2: Create a Feature Branch
Now, create a new feature branch called "feature/awesome-feature" and switch to it:
        # Create and switch to the feature branch
        git checkout -b feature/awesome-feature
Step 3: Make Commits on the Feature Branch
Add some commits to the feature branch to simulate work being done:
        # Make some changes and commit
        echo "Feature branch work 1" >> README.md
        git commit -am "Add feature branch work 1"

        # Make more changes and commit
        echo "Feature branch work 2" >> README.md
        git commit -am "Add feature branch work 2"
At this point, your repository has two branches: "main" and "feature/awesome-feature," with commits on the feature branch that are not on the main branch.
Step 4: Perform a Fast-Forward Merge
Now, we want to merge the changes from the feature branch into the main branch using a fast-forward merge. Since there have been no new commits on the main branch since the feature branch was created, this will result in a fast-forward merge.
        # Switch back to the main branch
        git checkout main

        # Perform a fast-forward merge of the feature branch into main
        git merge feature/awesome-feature
If there were no conflicts and no other commits on the main branch since the feature branch was created, this will execute a fast-forward merge. The main branch pointer will move to the tip of the feature branch, and the commit history remains linear:
        * feature/awesome-feature commit (latest)
        * feature/awesome-feature commit
        * Main branch commit (latest)
        * Initial commit on main branch
In this example, the changes made in the feature branch have been incorporated into the main branch without creating a new merge commit. Instead, the main branch pointer was simply moved to the latest commit on the feature branch, resulting in a linear commit history.
Squash Merging:
Another merging strategy is "squash merging," where all the changes from a feature branch are combined into a single commit before merging. This can help keep your commit history clean and concise.
To perform a squash merge, you can use the --squash option with git merge:
Here's an example of how to perform a squash merge:
Scenario: Suppose you have a feature branch named "feature/new-feature" with several small commits, and you want to squash them into a single commit before merging it into the main branch.
Step 1: Checkout the Feature Branch
First, ensure that you are on the branch you want to merge:
git checkout master
Step 2: Perform the Squash Merge
Use the git merge --squash command to squash the commits from the feature branch into a single commit on the current branch (master in this example):
git merge --squash feature/new-feature
Git will apply the changes from the feature branch but will stop before creating a commit, allowing you to customize the commit message.
Takes all commits from the feature/new-feature branch and groups it for a 1 commit with your current branch.
(no merge commit appears; you could resolve conflicts manually before following commit)
Step 3: Customize the Commit Message
Git will open a text editor where you can edit the commit message. The editor will display the combined changes from the feature branch and allow you to create a meaningful commit message for the squashed changes.
        # This is an example commit message
        #
        # Please enter the commit message for your changes. Lines starting
        # with '#' will be ignored, and an empty message aborts the commit.
        #
        # Changes to be committed:
        #       modified:   file1.txt
        #       modified:   file2.js
Edit the commit message to describe the changes succinctly and meaningfully. Remove any lines that you don't want to include in the message.
Squashed all changes from feature/new-feature
Save and close the text editor.
Step 4: Commit the Squashed Changes
After customizing the commit message, you need to commit the squashed changes:
git commit
This creates a new commit on the current branch (master) with all the changes from the feature branch squashed into a single commit.
Step 5: Push the Changes
Finally, if you want to share these changes with others or push them to a remote repository, you can use the git push command:
git push origin master
This pushes the changes on the master branch, including the squashed commit, to the remote repository.
In summary, a squash merge combines multiple small commits from a feature branch into a single commit on the target branch, providing a clean and concise commit history while retaining the changes made in the feature branch.
This command will apply the changes from "feature/new-feature" as a single commit on your current branch. You'll need to create a new commit message to describe the merged changes.
Merge Strategies:
Git offers various merge strategies, including "recursive" (default), "ours," and "theirs." These strategies determine how conflicts are resolved during a merge. You can specify a merge strategy using the -s option with git merge.
For example, to perform a merge using the "ours" strategy, which resolves conflicts by keeping the changes from the current branch, you can use:
git merge -s ours feature/new-feature
Git merge strategies can be helpful in complex merge scenarios, but they are less commonly used in everyday development.
Merging is a critical part of collaborative software development, allowing you to combine the work of multiple contributors and maintain a coherent codebase. Understanding how to use git merge effectively is essential for successful Git workflows.
Deleting a Branch:
To delete a branch, use the -d or -D option with the branch command. The -d option performs a safe delete, ensuring that the changes on the branch are merged into another branch first, while -D performs a force delete:
git branch -d <branch_name> # Safe delete
        git branch -D <branch_name>  # Force delete
        git push origin --delete branchname :- to delete remote branches
Advanced Git Commands:
Remote Repositories:
Viewing Remote Repositories:
To list the remote repositories associated with your local repository, you can use the
git remotecommand without any options:git remoteViewing Remote Details:
To view more detailed information about a specific remote, such as its URL, you can use the
-v(verbose) option:git remote -vThis will show both the remote's name and its URL.
Adding a Remote:
To add a remote repository, you can use the
git remote addcommand, specifying a name and a URL for the remote. For example:git remote add myrepo https://github_token@urlThis associates the URL with the name "myrepo."
Renaming a Remote:
To rename an existing remote, you can use the
git remote renamecommand. For example, to rename "myrepo" to "newrepo":git remote rename myrepo newrepoRemoving a Remote:
To remove a remote repository, you can use the
git remote removeorgit remote rmcommand, followed by the name of the remote. For example:git remote remove myrepoThis will remove the remote named "myrepo" from your configuration.
Fetching from a Remote:
To fetch changes from a remote repository (i.e., get the latest changes without merging them into your branch), you can use the
git fetchcommand with the remote name. For example:git fetch originThis retrieves the latest changes from the "origin" remote.
Pulling from a Remote:
To fetch and automatically merge the changes from a remote repository into your current branch, you can use the
git pullcommand with the remote name. For example:git pull origin mainThis fetches changes from the "origin" remote's "main" branch and merges them into your current branch.
Difference between git fetch and git pull
| Aspect | git fetch | git pull | | --- | --- | --- | | Operation Type | Fetches changes from remote, updates local references (read-only). | git pull(git fetch + git merge) Fetches changes and automatically merges them into the current branch. | | Working Directory | Leaves the working directory and current branch unchanged. | Updates the working directory and potentially changes the current branch. | | Merge Conflicts | Doesn't attempt to merge changes, so no automatic conflicts. | Can result in merge conflicts if changes conflict between local and remote branches. | | Branch Interaction | Doesn't affect the current branch; you can manually merge later. | Merges fetched changes directly into the current branch. | | Use Case | Useful for checking updates, reviewing changes, and planning merges. | Convenient for quickly updating the working directory with the latest changes and when you're ready to deal with any merge conflicts. | | Safety | Safer as it doesn't alter the working directory or introduce conflicts. | Requires careful handling of potential merge conflicts. | | Recommended Workflow | Fetch first to check for updates, then decide to merge (or pull if confident). | Use when you're confident that you want to merge and have no conflicts. |
In summary,
git fetchis a safer and more controlled operation for checking and preparing for updates, whilegit pullis a convenient way to both fetch and merge changes but requires attention to potential conflicts. The choice between them depends on your workflow and how you want to manage remote updates in your Git repository.Pushing to a Remote:
To push your local changes to a remote repository, you can use the
git pushcommand with the remote name and the name of the branch you want to push. For example:git push origin mainThis pushes your local "main" branch to the "origin" remote.
Changing the Remote URL:
To update the URL of an existing remote, you can use the
git remote set-urlcommand. For example, to change the URL of the "origin" remote:git remote set-url origin https://github.com/yourusername/new-repo-url.git
These are some common git remote commands for managing remote repositories in Git. Remote repositories are essential for collaborating with others and sharing your code with different platforms like GitHub, GitLab, and Bitbucket.
Restore:
The git restore command in Git is used to restore files in your working directory or staging area to a specific state. It's a useful command for undoing changes in your Git repository. The git restore command has different modes and options for restoring files, and its behavior can be customized based on your needs.
Here's a basic overview of how to use git restore:
Restoring Files in the Working Directory:
To restore a file in your working directory to its state in the last commit (HEAD), you can use the following command:
git restore <file_name>For example, if you have made changes to a file named "example.txt" and want to revert it to the state it was in the last commit:
git restore example.txtThis command will replace the modified file with the version from the last commit, effectively undoing any local changes.
This also helps when u have deleted the file and want to bring it back to its state so in this last commit version file will come :-

Restoring Files to a Specific Commit:
You can also restore a file to the state it was in at a specific commit by providing the commit hash and the file name:
git restore <commit_hash> -- <file_name>For example, to restore "example.txt" to the state it was in commit
abcdef1:git restore abcdef1 -- example.txtThis will replace the file with the version from the specified commit.
Restoring Files in the Staging Area:
To unstage changes (remove them from the staging area) for a file and restore it to the state in the last commit, you can use the
--stagedoption:git restore --staged <file_name>For example, if you have added a file to the staging area but want to unstage it and revert it to the last commit:
git restore --staged example.txtThis will remove the file from the staging area and keep your working directory's version intact.
Rebase:
git rebaseis a powerful Git command used to modify and streamline the commit history of a branch. It's often used to incorporate changes from one branch onto another or to squash and reorganize commits. when we rebase we put obe branch on top of another.when we merge git history are not changed bt when we do rebase we modify git history and we dont now when a particular branch is rebased. Let's go through some common use cases forgit rebasewith examples.Example Scenario:
Let's say you have a feature branch named
feature/branchbased on themainbranch, and you want to rebase the feature branch onto the latest changes inmain.1. Basic Rebasing:
To perform a basic rebase, you can use the following steps:
Checkout the Feature Branch: First, make sure you're on the feature branch:
git checkout feature/branchRebase onto Main: Use
git rebaseto rebase the feature branch onto the latest changes in themainbranch:git rebase mainThis will apply your feature branch's commits on top of the
mainbranch's latest commit.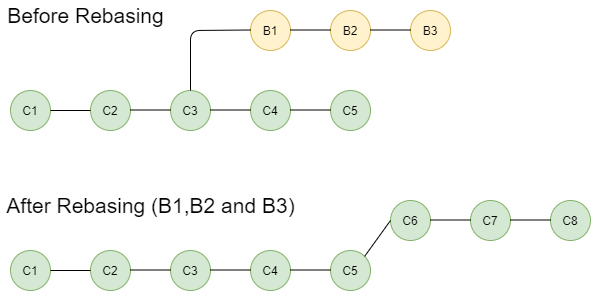


If there are conflicts, Git will pause to allow you to resolve them. After resolving conflicts (if any), continue with:
git rebase --continuePush Changes: Finally, if you've rebased a branch that you've already pushed to a remote repository, you'll need to force push to update the remote branch:
git push -f origin feature/branch
2. Interactive Rebasing:
Interactive rebasing allows you to squash, edit, or reorder commits during the rebase process.
Checkout the Feature Branch: Ensure you're on the feature branch:
git checkout feature/branchStart an Interactive Rebase: To start an interactive rebase, use the
-iflag:git rebase -i main git rebase -i HEAD~4 :- open last four commits
This will open an editor with a list of your branch's commits. You can choose to squash, edit, or reorder commits as needed .
Interactive Rebase Editor: The interactive rebase editor might look like this:
 pick abc123 First commit
 squash def456 Second commit
 pick 789xyz Third commit
Change
picktosquash(ors) for commits you want to squash into the previous commit.
Change
picktoedit(ore) for commits you want to edit.
Squashing Commits: If you want to squash commits, save and exit the editor. Git will prompt you to combine the commit messages into one. Edit the message as needed.
Editing Commits: If you selected
editfor a commit, Git will pause the rebase process at that commit. Make your changes and commit them:git commit --amendThen continue the rebase:
git rebase --continueFinish the Rebase: After all commits are squashed or edited, finish the rebase:
egit rebase --continueForce Push: If you've rebased a branch that's already been pushed, you'll need to force push to update the remote branch:
git push -f origin feature/branch
Interactive rebasing gives you fine-grained control over your branch's commit history and is useful for creating clean, concise, and organized commit histories.
Rebasing can be a powerful tool, but it's important to use it with caution, especially on branches that you've shared with others, as it rewrites commit history.
Stash:
The
git stashcommand in Git is used to temporarily save changes that you have made in your working directory but do not want to commit yet. Stashing allows you to switch to a different branch or work on another task without committing incomplete changes. Later, you can reapply these stashed changes to your working directory. Here's how to usegit stashwith examples:1. Stash Changes:
To stash your current changes, use the following command:
git stashThis will save all uncommitted changes, including changes to tracked files and untracked files.
2. List Stashes:
You can list your stashes to see what you've stashed using:
git stash listThis will display a list of your stashes, each with a unique name (e.g.,
stash@{0},stash@{1}).3. Apply a Stash:
To apply the most recent stash (stash@{0}) and remove it from the stash list, use:
git stash popAlternatively, to apply a specific stash (e.g.,
stash@{1}), you can use:git stash apply stash@{1}4. Apply Stash as a New Commit:
To apply a stash as a new commit on a branch, you can use the
git stash branchcommand. This command creates a new branch from the stash and applies the changes as a new commit on that branch. Here's an example of how to do this:git stash branch <new-branch-name> stash@{1}This command creates a new branch (
<new-branch-name>) and applies the specified stash to that branch as a new commit.Here's a step-by-step breakdown of the process:
 # Verify the current branch (optional)
 git branch

 # Create and switch to a new branch from the stash (e.g., stash@{1})
 git stash branch new-feature-branch stash@{1}

 # Verify that the changes from the stash are applied as a new commit
 git log

 # Continue working on the new branch, make more commits, and push changes as needed
5. Clear or Drop a Stash:
To remove a specific stash (e.g.,
stash@{1}) from the stash list without applying it, use:git stash drop stash@{1}To remove the most recent stash (stash@{0}) without applying it, you can simply use:
git stash drop6. Clear All Stashes:
To clear all stashes, use:
git stash clearUsing
git stashis a handy way to manage and switch between different tasks or branches without committing incomplete work. It helps maintain a clean and organized commit history.Reset:
In Git, thegit resetcommand is used to move the HEAD and branch pointers to a different commit, effectively "resetting" the branch to a different state. It can be a powerful command but should be used with caution because it can rewrite history and potentially discard commits. Here are some common use cases forgit resetwith examples:Unstage changes from the staging area:
git reset1. Soft Reset:
A soft reset moves the branch pointer to a different commit, but it doesn't change your working directory or staging area. It's useful for uncommitting changes while keeping them staged for recommitting.
Example: To undo the last commit and keep the changes staged:
  # Perform a soft reset to the previous commit (HEAD~1)
  git reset --soft HEAD~1
2. Mixed Reset (Default):
A mixed reset (which is the default) moves the branch pointer to a different commit and unstage changes. It's useful when you want to unstage changes but keep them in your working directory for further modifications.
Example: To undo the last commit and unstage changes:
  # Perform a mixed reset to the previous commit (HEAD~1)
  git reset HEAD~1
3. Hard Reset:
A hard reset moves the branch pointer to a different commit, discards all changes in your working directory and staging area, and sets your project to the state of the specified commit. It should be used with caution as it can result in data loss.
Example: To completely remove the last commit along with its changes:
  # Perform a hard reset to the previous commit (HEAD~1)
  git reset --hard HEAD~1
4. Reset to a Specific Commit:
You can also reset to a specific commit by providing its commit hash or reference. This allows you to move the branch pointer to a particular commit.
Example: To reset to a specific commit using its commit hash:
  # Reset to a specific commit (replace <commit_hash> with the actual hash)
  git reset --hard <commit_hash>
5. Undoing Multiple Commits:
You can use
git resetto undo multiple commits at once by specifying how many commits you want to move back in the history.Example: To undo the last two commits and keep changes in your working directory:
  # Undo the last two commits and keep changes in the working directory
  git reset --soft HEAD~2
6. Moving Branch Pointers:
In addition to undoing commits, you can use
git resetto move branch pointers to a different commit without changing the state of your working directory or staging area.Example: To move a branch pointer to a specific commit without changing your working directory:
  # Move the branch pointer to a specific commit
  git reset --soft <commit_hash>
Remember that when using
git resetto alter commit history, be careful if you've already pushed the branch to a remote repository. Force-pushing may be required to update the remote branch and can lead to collaboration issues. Usegit revertif you want to safely undo commits that have been pushed and shared with others.
Revert:
In Git, the git revert command is used to create a new commit that undoes the changes introduced by a previous commit. It's a safe way to revert changes without rewriting Git history, making it suitable for situations where you need to undo a commit that has already been pushed to a shared repository. Here are some common use cases for git revert with examples:
Now, you can use the git revert command followed by the commit hash to create a new commit that undoes the changes from the specified commit.
    # Revert commit C by creating a new revert commit
    git revert <commit_hash>
Replace <commit_hash> with the actual hash of the commit.
Cherry-Pick:
In Git,
git cherry-pickis a command used to apply a specific commit from one branch to another. This can be useful when you want to pick and apply a single commit from a different branch without merging the entire branch. Here are some common use cases forgit cherry-pickwith examples:Example Scenario:
Let's assume you have two branches,
feature/branch-Aandfeature/branch-B, and you want to apply a commit frombranch-Atobranch-Bwithout merging the entirebranch-Aintobranch-B.1. Identify the Commit to Cherry-Pick:
First, you need to identify the commit you want to cherry-pick. You can find the commit hash using
git logor by checking the commit history on the source branch (branch-A).# List commits in branch-A git log feature/branch-A2. Cherry-Pick the Commit:
Now, you can cherry-pick the commit from
branch-Atobranch-B. Use thegit cherry-pickcommand followed by the commit hash:# Cherry-pick a specific commit from branch-A to branch-B git cherry-pick <commit_hash>Replace
<commit_hash>with the actual hash of the commit you want to apply.Example:
Suppose you want to cherry-pick the commit with the hash
abcdef1frombranch-Atobranch-B. Here's the command:# Cherry-pick the commit with hash abcdef1 git cherry-pick abcdef13. Resolve Conflicts (if any):
If there are conflicts between the changes in the cherry-picked commit and the current state of
branch-B, Git will pause the cherry-pick process and indicate the conflicted files. You will need to manually resolve these conflicts by editing the files and then committing the resolved changes:# Resolve conflicts and edit the conflicted files # Add the resolved files to the staging area git add <resolved_files> # Commit the resolution git commit4. Continue or Finish the Cherry-Pick:
Once you have resolved the conflicts, continue the cherry-pick process using:
 # Continue the cherry-pick
 git cherry-pick --continue
Alternatively, if you encounter an error or want to abort the cherry-pick, you can use:
 # Abort the cherry-pick
 git cherry-pick --abort
5. Push Changes (if needed):
After successfully cherry-picking the commit, you can push the changes to the remote repository if you want to share them with others:
 # Push changes to the remote branch-B
 git push origin feature/branch-B
This process allows you to selectively apply individual commits from one branch to another, providing fine-grained control over the integration of changes between branches in Git.
Gitignore:
Create a
.gitignorefile to specify files/directories to be ignored:touch .gitignore
Git Tagging:
In Git, tags are used to mark specific commits as significant points in the project's history, such as version releases. Tags provide a way to label and reference specific commits easily. Here's an example of how to create and work with Git tags:
Create an annotated tag:
  git tag -a <tag_name> -m "Tag message"
  git tag -a <tag_name> -m "Tag message" commitid
To list all the tags in your Git repository using the
git tagcommand:# List all tags git tagShowing Tag Information:
To see detailed information about a specific tag, use
git showfollowed by the tag name:# Show information about a specific tag (e.g., v1.0) git show <tag name>Pushing Tags to a Remote Repository:
To share tags with others, you need to push them to a remote repository. Use the
git pushcommand with the--tagsoption to push all tags:# Push all tags to the remote repository git push origin --tagsChecking Out a Specific Tag:
You can check out a specific tag to create a new branch from it or to view the code at that specific version:
  # Checkout a specific tag to create a new branch
  git checkout -b new-branch-name v1.0
Deleting a Tag:
To delete a tag, use the
git tag -dcommand followed by the tag name:# Delete a tag (e.g., v1.0) git tag -d v1.0Renaming a Tag:
To rename a tag, you need to delete the old tag and create a new one with the desired name:
  # Rename a tag (e.g., rename v1.0 to v1.1)
  git tag -d v1.0
  git tag v1.1
Tagging a Past Commit:
You can also tag a specific commit by providing its commit hash:
  # Create a tag for a specific commit (replace <commit_hash> with the actual hash)
  git tag v1.2 <commit_hash>
These are some of the basic operations related to Git tags. Tags are valuable for marking significant milestones in your project's history, making it easier to reference specific versions and releases.
Clean:
The
git cleancommand is used to remove untracked files and directories from your working directory. These are files and directories that are not part of your Git repository and are not being tracked by Git. Be cautious when using this command, as it can permanently delete files and data.Here are some common usage examples of the
git cleancommand:1. List Untracked Files and Directories:
You can use the
-nor--dry-runoption to see what files and directories would be removed without actually deleting them:git clean -n2. Remove Untracked Files:
To remove untracked files (but not directories), you can use the
-for--forceoption:git clean -f bashCopy codegit clean -df :- to remove dir and file bothThis command will remove all untracked files in your working directory. Be careful when using the
-foption, as it can't be undone.4. Remove Ignored Files:
By default,
git cleandoesn't remove files that are ignored by Git (as specified in your.gitignorefile). To remove ignored files as well, you can use the-xoption:git clean -xf git clean -xdf :- To remove both ignored files and directories6. Dry Run for Removing Ignored Files and Directories:
If you want to see what would be removed, including ignored files and directories, use the
-n(dry run) option with-xand-d:git clean -nxdfThis command will show you what would be deleted without actually removing anything.
7. Remove Files Matching Patterns:
You can also remove files that match specific patterns using the
-eoption followed by a pattern. For example, to remove all.logfiles:git clean -f -e "*.log"Warning:
Be very cautious when using
git clean, especially with the-f(force) option, as it can delete data irreversibly. Always double-check what would be removed using the-n(dry run) option before running the command without it. Ensure that you have backups or a safe way to recover any important data that might be deleted.Some git interview question:-
Comparison of centralized vs. decentralized version control system

Git and Github Difference:

Clone and fork difference:
Git Merge and git rebase:

These commands should help you get started with Git for basic version control and collaboration. As you become more familiar with Git, you can explore additional features and workflows tailored to your project's needs.
GITHUB:
GitHub is a web-based platform and service that provides tools for version control and collaborative software development. It's a central hub for developers, teams, and organizations to work together on code, track changes, manage projects, and build software. some use cases of git hub.
Connect github repository for push and pull
To connect to github repo we can do using ssh and https here i am explaining https one:
First we need to create one token steps written below
1.login to git hub
go to settings >Developer settings >

Click on personal access tokens

click on token classic > generate new token(classic) > enter details and your token will be generated copy that token so that u can set remote url in git.
your changes, and push them back to GitHub.
 In you server where git is intalled you can add remote url using following
 # Make changes to files
 git init
 git add .
 git commit -m "Your commit message"
 git remote set-url --add origin https://Accesstoken@giturl
 example
 git remote set-url --add origin https://ghp_6sU@github.com/Niljay892/node_to_do_app.git
 git remote -v :- to show remote urls
 git remote set-url --delete origin url :- to delete url which you dont want
There are many more functionalities of the git hub like adding collaborators, creating PR(PULL REQUEST) AND adding reviewers.
Conclusion
In your journey with Git and GitHub, remember that practice and real-world experience are key to mastering these tools. So, dive into repositories, contribute to open source, collaborate with others, and watch your skills flourish. Git and GitHub are not just tools; they're gateways to a world of opportunities in the realm of software development.
Thank you for joining us on this Git and GitHub adventure. Happy coding and collaborating!


